The world of computing has never been more accessible or affordable, thanks in large part to the ingenious innovation of the Raspberry Pi. From industries large and small, to the kitchen table tinkerer, and even to the classroom coder, Raspberry Pi Holdings PLC has made powerful computing available to everyone. This tiny yet mighty computer, designed to make learning programming fun through practical projects, is also an incredibly versatile platform for building sophisticated Internet of Things (IoT) solutions. If you've ever dreamed of controlling devices or monitoring environments from afar, then embarking on a Raspberry Pi Remote IoT Tutorial is your perfect starting point.
The Internet of Things, or IoT, is transforming how we interact with the physical world, connecting everyday objects to the internet, allowing them to send and receive data. Imagine being able to check the temperature of your home from your office, or turning off a light in another room with a tap on your phone. These are not futuristic fantasies but practical applications made possible by IoT. With its low cost, compact size, robust Linux operating system, and crucial General Purpose Input/Output (GPIO) pins, the Raspberry Pi stands out as an ideal candidate for bridging the gap between the digital and physical realms, empowering you to build your very own remote IoT systems.
Table of Contents
- The Raspberry Pi: A Foundation for Innovation
- Why Remote IoT with Raspberry Pi?
- Getting Started: Your Raspberry Pi Setup for IoT
- Essential Tools and Software for Remote IoT
- Building Your First Remote IoT Project: A Step-by-Step Tutorial
- Advanced Remote IoT Concepts with Raspberry Pi
- Real-World Applications and Community Support
- Troubleshooting Common Remote IoT Issues
The Raspberry Pi: A Foundation for Innovation
At its core, the Raspberry Pi is a series of small, single-board computers developed in the United Kingdom by the Raspberry Pi Foundation. This charitable organization, registered in England and Wales with number 1129409, has a powerful mission: "to enable young people to realise their full potential through the power of computing and digital technologies." What started as an initiative to promote the teaching of basic computer science in schools has blossomed into a global phenomenon. Today, millions use the Raspberry Pi for anything from learning programming from the ground up to serving as a fully fledged desktop PC, and of course, for countless innovative projects in between.
The allure of the Raspberry Pi lies in its simplicity, affordability, and remarkable versatility. It's a very cheap computer that runs Linux, providing a robust and flexible operating environment. Crucially, it also provides a set of GPIO (General Purpose Input/Output) pins. These pins are the gateway to physical computing, allowing you to connect and control electronic components like sensors, LEDs, motors, and more. This unique combination of a full-fledged computer and direct hardware interaction capabilities makes the Raspberry Pi an unparalleled tool for anyone looking to delve into robotics, home automation, or, as we'll explore in this Raspberry Pi Remote IoT Tutorial, remote IoT applications. The Foundation itself offers free online coding resources and challenges, making computing accessible and affordable for everybody, truly fostering a global community of learners and innovators.
Why Remote IoT with Raspberry Pi?
The concept of the Internet of Things is about connectivity – making devices smart by connecting them to a network, typically the internet. Remote IoT takes this a step further, enabling you to interact with these devices from anywhere in the world. Imagine a sensor in your garden that tells you when your plants need water, or a smart lock on your front door that you can unlock for a friend from miles away. These are the kinds of powerful, practical projects that become achievable with remote IoT.
So, why choose the Raspberry Pi as the brain for your remote IoT projects? The answer lies in its unique blend of features and the philosophy behind its creation. Firstly, it offers cost-effective, high-performance computing for businesses and the home. Unlike specialized microcontrollers, the Raspberry Pi runs a full operating system (Raspberry Pi OS), allowing for complex logic, network communication, and even web server capabilities directly on the device. This means you can build sophisticated IoT gateways or edge computing devices without needing additional hardware. Secondly, its Linux base provides a familiar and powerful environment for developers, with access to a vast array of open-source tools and libraries. Finally, the GPIO pins are the direct link to the physical world. You can connect various sensors (temperature, humidity, motion) and actuators (relays, motors, lights) and control them programmatically. This comprehensive capability, combined with its affordability, makes the Raspberry Pi an ideal platform for anyone, from the kitchen table tinkerer to large industries, looking to implement robust and scalable remote IoT solutions. It truly makes computing accessible and affordable for everyone, fostering innovation across all scales.
Getting Started: Your Raspberry Pi Setup for IoT
Before diving into the exciting world of remote IoT, you need to prepare your Raspberry Pi. This foundational step ensures your device is ready to communicate, process data, and interact with the physical world. This part of our Raspberry Pi Remote IoT Tutorial will guide you through the initial setup process.
Choosing Your Raspberry Pi Model
The Raspberry Pi family has grown significantly over the years, offering various models with different specifications. We can divide the Raspberry Pi products into 5 main families, each suited for different needs. For most IoT projects, even a Raspberry Pi Zero W or a Raspberry Pi 3 Model B+ can suffice, especially for simpler tasks like sensor monitoring. However, for more complex applications requiring significant processing power, multiple camera feeds, or extensive data logging, a Raspberry Pi 4 Model B or even a Raspberry Pi 5 would be a better choice. Consider factors like built-in Wi-Fi and Bluetooth (essential for remote IoT), RAM, and the number of GPIO pins available. All models run Raspberry Pi OS, ensuring software compatibility across the board.
Installing Raspberry Pi OS with Imager
Raspberry Pi OS (previously called Raspbian) is our official supported operating system, offering a stable and user-friendly environment for your projects. The quickest and easiest way to get it onto your microSD card is by using Raspberry Pi Imager. This free tool streamlines the process significantly:
- Download Raspberry Pi Imager: Visit the official Raspberry Pi website and download the Imager for your computer's operating system (Windows, macOS, or Ubuntu).
- Insert MicroSD Card: Place your microSD card (at least 8GB, Class 10 recommended) into your computer's card reader.
- Launch Imager: Open the Raspberry Pi Imager application.
- Choose OS: Click "CHOOSE OS" and select "Raspberry Pi OS (64-bit)" or "Raspberry Pi OS (Legacy)" depending on your Pi model and preference. For most modern projects, the 64-bit version is recommended.
- Choose Storage: Click "CHOOSE STORAGE" and select your microSD card from the list. Be absolutely sure you select the correct drive, as this process will erase all data on it.
- Write: Click "WRITE" to begin the installation. The Imager will download the OS, write it to the card, and verify the installation. This process can take some time depending on your internet speed and card speed.
Once the writing process is complete, safely eject the microSD card from your computer. Your Raspberry Pi is now ready to boot with its operating system.
Initial Configuration for Remote Access
To enable remote access without needing a monitor, keyboard, and mouse connected to your Pi, you'll need to pre-configure a few settings on the freshly imaged microSD card. This is a crucial step in any Raspberry Pi Remote IoT Tutorial.
- Enable SSH: SSH (Secure Shell) allows you to remotely access your Raspberry Pi's command line. To enable it, create an empty file named `ssh` (no extension) in the root directory of the boot partition of your microSD card.
- Configure Wi-Fi (if applicable): For wireless connectivity, create a file named `wpa_supplicant.conf` in the root directory of the boot partition. Add the following content, replacing `YOUR_NETWORK_NAME` and `YOUR_NETWORK_PASSWORD` with your actual Wi-Fi credentials:
This will allow your Pi to connect to your Wi-Fi network automatically on boot.country=US # Change to your country code, e.g., GB for UK update_config=1 network={ ssid="YOUR_NETWORK_NAME" psk="YOUR_NETWORK_PASSWORD" } - Change Default Password (Highly Recommended): For security, it's vital to change the default 'pi' user password from 'raspberry'. While you can do this after the first boot via SSH using `passwd`, some advanced users might pre-configure this. For beginners, changing it after the first SSH connection is sufficient.
After these steps, insert the microSD card into your Raspberry Pi, connect it to power, and let it boot up. You should then be able to find its IP address on your network (e.g., via your router's administration page or a network scanner tool like Angry IP Scanner) and connect to it remotely via SSH. This sets the stage for truly remote interaction.
Essential Tools and Software for Remote IoT
With your Raspberry Pi set up, you'll need a suite of tools and software to effectively manage and program your remote IoT projects. These components form the backbone of any robust Raspberry Pi Remote IoT Tutorial, enabling seamless communication and control.
- SSH Client: This is your primary tool for interacting with your Raspberry Pi's command line remotely.
- Windows: PuTTY is the most popular choice, offering a simple interface to connect via SSH.
- macOS/Linux: The built-in Terminal application supports SSH directly. You simply type `ssh pi@your_pi_ip_address`.
- VNC Viewer: While SSH gives you command-line access, VNC (Virtual Network Computing) allows you to see and interact with the Raspberry Pi's graphical desktop environment remotely. This is incredibly useful for visual debugging, browsing files, or using graphical applications. RealVNC Viewer is a common and reliable choice.
- MQTT Broker (e.g., Mosquitto): MQTT (Message Queuing Telemetry Transport) is a lightweight messaging protocol designed for constrained devices and low-bandwidth, high-latency networks – making it perfect for IoT. An MQTT broker acts as a central hub that receives messages from devices (publishers) and sends them to other devices (subscribers). Mosquitto is a popular open-source MQTT broker that can be easily installed on your Raspberry Pi or run on a separate server.
- Programming Languages:
- Python: This is by far the most popular and recommended language for Raspberry Pi IoT projects. Python is easy to learn, has a vast ecosystem of libraries, and integrates seamlessly with hardware (GPIO) and network protocols (MQTT, HTTP). Our team of expert educators often use Python to "write powerful programs and build exciting physical computing projects."
- Node.js, C/C++: While Python is dominant, other languages like Node.js (for JavaScript developers) or C/C++ (for performance-critical applications) can also be used.
- Libraries for GPIO Control: For Python, the `RPi.GPIO` library is the standard for interacting with the Raspberry Pi's GPIO pins. It allows you to set pin modes (input/output), read digital inputs, write digital outputs, and even control PWM (Pulse Width Modulation) for things like dimming LEDs or controlling motor speed.
- Code Editor: While you can use `nano` or `vim` in the terminal, a more feature-rich code editor on your local machine (like VS Code, Sublime Text, or Thonny) can significantly improve your development workflow, especially when combined with SSH for remote file editing or synchronization.
Having these tools at your disposal will equip you to efficiently develop, deploy, and manage your remote IoT applications, transforming your Raspberry Pi into a powerful IoT hub.
Building Your First Remote IoT Project: A Step-by-Step Tutorial
Now that your Raspberry Pi is configured and you're familiar with the essential tools, it's time to build something tangible. For this Raspberry Pi Remote IoT Tutorial, we'll create a simple yet illustrative project: remotely controlling an LED and reading data from a simple sensor. This will demonstrate both remote actuation and remote monitoring.
Hardware Connection (GPIO Basics)
The Raspberry Pi's GPIO pins are the bridge to the physical world. For our project, you'll need:
- A Raspberry Pi (any model with GPIO pins).
- A breadboard.
- Jumper wires.
- An LED.
- A 330-ohm resistor (for the LED).
- A simple digital sensor, e.g., a DHT11/DHT22 temperature/humidity sensor (or a simple push button for digital input).
Connecting the LED:
- Connect one leg of the 330-ohm resistor to a GPIO pin (e.g., GPIO 17, which is physical pin 11).
- Connect the other leg of the resistor to the long leg (anode) of the LED.
- Connect the short leg (cathode) of the LED to a GND (Ground) pin on the Raspberry Pi.
Connecting the DHT11/DHT22 Sensor (example):
- Connect the VCC pin of the DHT11/DHT22 to a 3.3V pin on the Raspberry Pi.
- Connect the GND pin of the DHT11/DHT22 to a GND pin on the Raspberry Pi.
- Connect the Data pin of the DHT11/DHT22 to a GPIO pin (e.g., GPIO 4, which is physical pin 7).
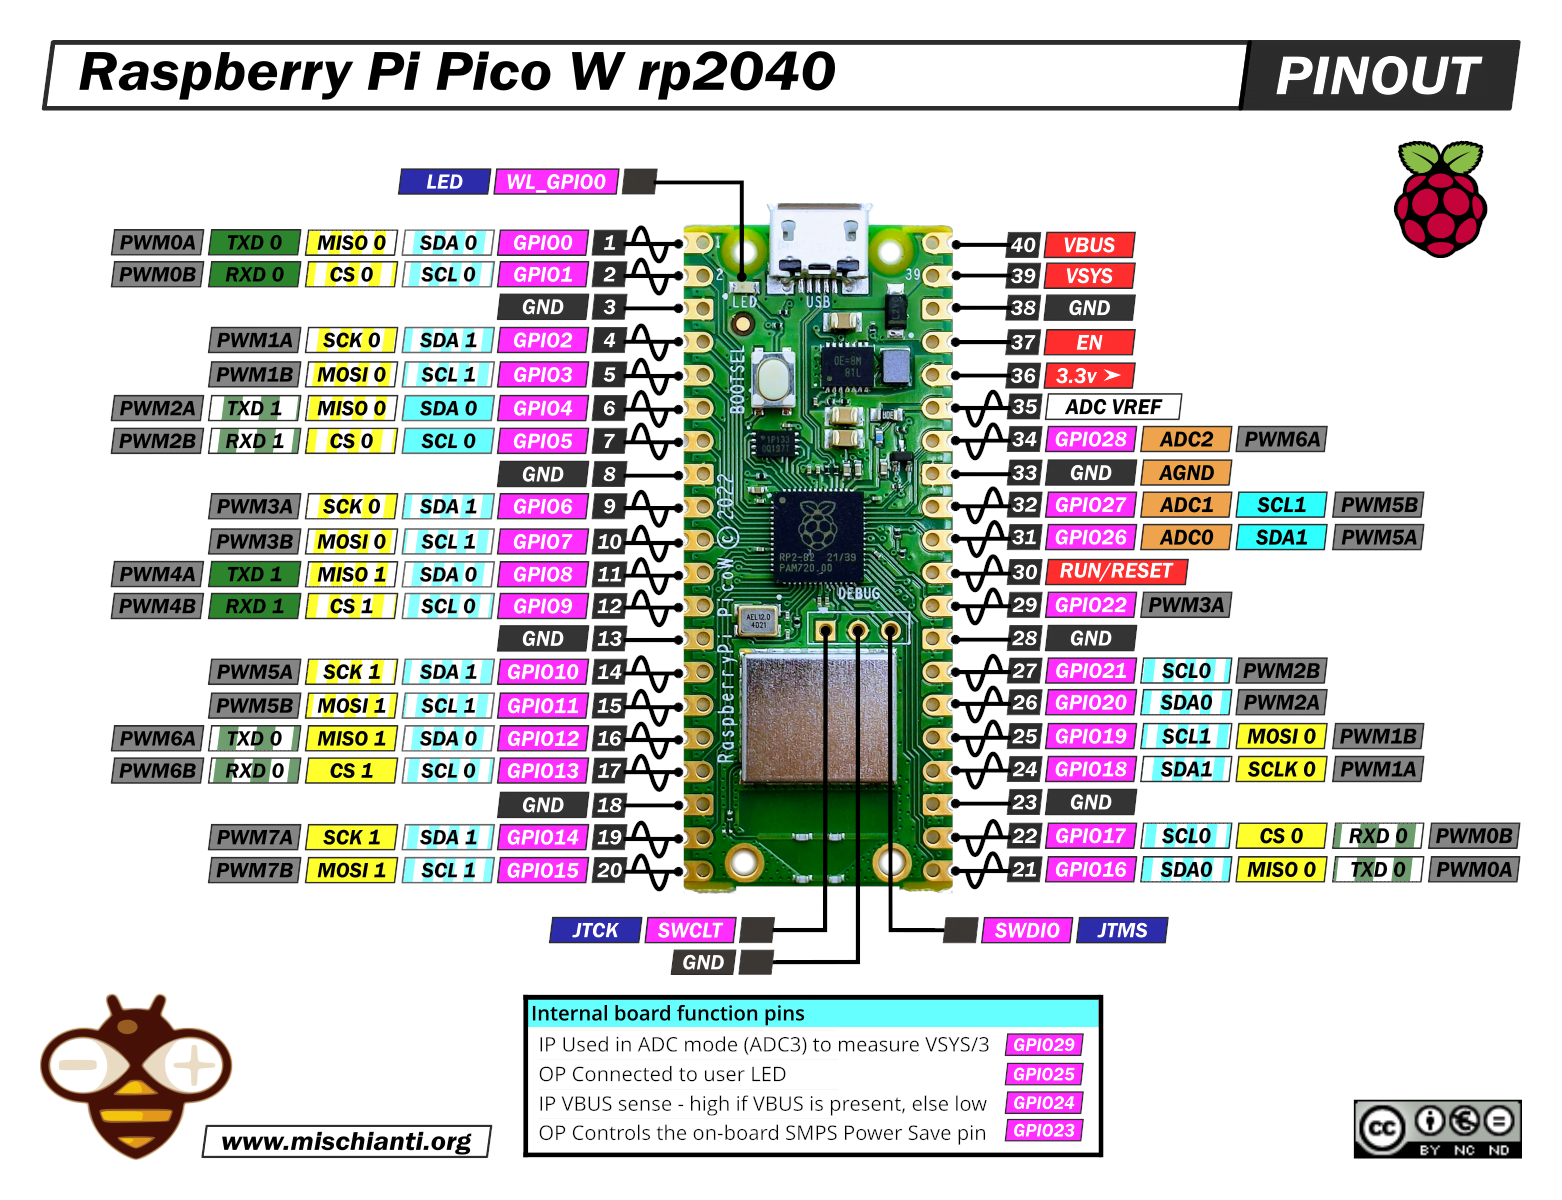
Important Safety Note: Always double-check your wiring before powering on your Raspberry Pi. Incorrect wiring, especially connecting 5V to a 3.3V-only GPIO pin, can permanently damage your Pi. Refer to a reliable Raspberry Pi GPIO pinout diagram.
Python Scripting for Sensor/Actuator Control
Now, let's write the Python code to interact with our hardware. You'll need to install the `RPi.GPIO` library and, for the DHT sensor, the `Adafruit_DHT` library.
sudo apt update sudo apt install python3-pip pip3 install RPi.GPIO pip3 install adafruit-circuitpython-dht # For DHT sensor sudo apt-get install libgpiod2 # Dependency for adafruit-circuitpython-dht Python Script (iot_controller.py) for LED Control and Sensor Reading:
import RPi.GPIO as GPIO import time import adafruit_dht import board # --- LED Configuration --- LED_PIN = 17 # GPIO17, physical pin 11 GPIO.setmode(GPIO.BCM) # Use BCM numbering for GPIO pins GPIO.setup(LED_PIN, GPIO.OUT) # Set LED pin as output # --- DHT Sensor Configuration --- DHT_SENSOR_PIN = board.D4 # GPIO4, physical pin 7 dht_device = adafruit_dht.DHT22(DHT_SENSOR_PIN, use_pulseio=False) # Use DHT22, set to DHT11 if you have that def toggle_led(): """Toggles the LED state.""" current_state = GPIO.input(LED_PIN) if current_state == GPIO.HIGH: GPIO.output(LED_PIN, GPIO.LOW) print("LED OFF") else: GPIO.output(LED_PIN, GPIO.HIGH) print("LED ON") def read_dht_sensor(): """Reads temperature and humidity from DHT sensor.""" try: temperature_c = dht_device.temperature humidity = dht_device.humidity if temperature_c is not None and humidity is not None: temperature_f = temperature_c * (9 / 5) + 32 print(f"Temp: {temperature_c:.1f}°C / {temperature_f:.1f}°F, Humidity: {humidity:.1f}%") return {"temperature_c": temperature_c, "temperature_f": temperature_f, "humidity": humidity} else: print("Failed to retrieve data from DHT sensor.") return None except RuntimeError as error: print(f"DHT sensor error: {error.args[0]}") time.sleep(2.0) return None except Exception as error: dht_device.exit() raise error if __name__ == "__main__": print("Starting IoT controller...") try: while True: # Example: Toggle LED every 5 seconds (for demonstration) # toggle_led() # time.sleep(1) # Short delay after toggle # Read sensor data periodically sensor_data = read_dht_sensor() if sensor_data: # In a real IoT app, you'd publish this data via MQTT pass # Placeholder for MQTT publishing time.sleep(5) # Read sensor every 5 seconds except KeyboardInterrupt: print("Exiting program.") finally: GPIO.cleanup() # Clean up GPIO settings on exit if dht_device: dht_device.exit() Save this file as `iot_controller.py` on your Raspberry Pi. You can transfer it using `scp` (secure copy) from your local machine via SSH, or simply create and edit it directly using `nano` in your SSH terminal.
Implementing Remote Access via SSH/MQTT
Now, let's integrate remote access. For simple control, you can just SSH into your Pi and run the script. For true IoT, we'll use MQTT.
1. Install Mosquitto MQTT Broker on Raspberry Pi (if not already on a separate server):
sudo apt update sudo apt install mosquitto mosquitto-clients sudo systemctl enable mosquitto.service sudo systemctl start mosquitto.service 2. Modify Python Script for MQTT: Install the Paho MQTT client library for Python:
pip3 install paho-mqtt Update `iot_controller.py` to publish sensor data and subscribe to LED control commands:
import RPi.GPIO as GPIO import time import adafruit_dht import board import paho.mqtt.client as mqtt import json # --- MQTT Configuration --- MQTT_BROKER = "localhost" # Or the IP address of your MQTT broker MQTT_PORT = 1883

Detail Author:
- Name : Mr. Jessie Pouros
- Username : lkuhn
- Email : nienow.flavie@yost.com
- Birthdate : 1992-02-05
- Address : 8060 Josianne Circle Suite 920 Port Sadyeview, OK 13533-0007
- Phone : (337) 285-7472
- Company : Kulas and Sons
- Job : Drywall Installer
- Bio : Nostrum iusto est vel. Assumenda autem possimus provident est architecto. Consectetur ea unde consequatur aut. Labore perspiciatis impedit quod temporibus.
Socials
instagram:
- url : https://instagram.com/zachery.grimes
- username : zachery.grimes
- bio : Omnis non nesciunt et velit. Totam ea consequatur ipsum dolore qui. Voluptatem qui ut qui ex ipsa.
- followers : 3657
- following : 2048
facebook:
- url : https://facebook.com/zacherygrimes
- username : zacherygrimes
- bio : Alias molestias exercitationem blanditiis vero delectus odit.
- followers : 1188
- following : 1871
tiktok:
- url : https://tiktok.com/@zacherygrimes
- username : zacherygrimes
- bio : Laborum voluptatem doloribus dolore iure. Odio illo quia itaque architecto.
- followers : 2752
- following : 2158
